電算倶楽部2021年まとめ
2021年も終わりということで、今年やったことをまとめます。 半分会社の活動として行っているので、コロナ禍で集まるのに抵抗がありなかなか積極的な活動ができない1年でした。
定例会開催
オンライン・オフライン合わせ12回実施しました。 電子工作キットや8bitマイコンなど、物理的なモノとプログラミングを組み合わせた勉強をされている方が多かったように思えます。 講義はWebAPI、プロジェクトマネジメント、Notionなどを扱いました。
スマホアプリ開発入門講座
オンライン勉強会ということで、connpassで参加者募集して開いてみました(結局参加したのは倶楽部メンバーだけでしたが) プログラミング有りでの開発を目指したのですが、前提知識が多くて初心者向け入門講座は難しいなと感じました。もっとノーコード・ローコードが流行ればいいですね。
Twitterはじめました(おかげでブログの更新頻度が…)
情報処理技術者試験
メンバーの中で情報処理技術者を取得したという話をポツポツと聞きました。 私もひとつ取得しました。これで取れる資格は取りきったので、次は別の目標を立てますかね。
来年も活動を継続しつつ、変化のある一年にします。
Web APIを使ったウェブサービス連携
電算倶楽部定例会でWebAPIについて扱ったので、ブログでもまとめておきます。 WebAPIって何?という人を対象にしています。
Web APIについて
APIとは
Application Programming Interfaceの略。 アプリケーションを外部のプログラムから操作できるようにするインターフェース(つなげる窓口)のこと。厳格な定義はなさそう(概念的)。 仕事で以下のような仕組みを使っていますが、これらもAPIの一つと言えそうです。
Web APIとは
ざっくりですが、インターネット等のWebの技術を使って異なるコンピュータのソフトウェア同士でデータのやり取りしたり機能を実行したりする仕組みのこと。 広い意味を表すようだが、今回は(私の知る限り)よく使われるHTTPを使ったものに限定する。
- HTTP(ウェブサイトを見たりするための取り決め)の技術を使用。
- インターネット上のアプリケーションを操作する仕組み。
- データについては規定はないが、最近はJSONを使うことが多い。
代表的なサービスと機能の例
以下は電算倶楽部で使っているアプリケーションです。
例1. ISBNから書籍情報を検索する
ブラウザから例を見てみる
認証が不要なものはブラウザから見ることができるものもある。 OpenBDというサービス。
https://api.openbd.jp/v1/get?isbn=(ISBN)にアクセスすると、その書籍情報が取得できる。認証不要。
例: https://api.openbd.jp/v1/get?isbn=9784479795827
プログラムから使う
ブラウザで見た情報をプログラムで取得し、JSONを処理してタイトルと著者のみ取り出す。
import requests
import json

def get_bookinfo(isbn:str):
    url = f'https://api.openbd.jp/v1/get?isbn={isbn}'
    response = requests.get(url)
    if response.ok:
        return response.json()
    else:
        return none

def main():
    res = get_bookinfo('9784479795827')
    if res is none:
        exit()
    print('========取得データ========')
    print(json.dumps(res, indent=2, ensure_ascii=false))
    print('========データを取得========')
    summary = res[0]['summary']
    title = summary['title']
    author = summary['author']
    print(f'[{author}] : {title}')

if __name__ == '__main__':
    main()
例2. Twitterのトレンドを取得する
TwitterのAPIを使うには、開発者登録をしてAPIキーを取得することが必要。
import requests
import json
import os

bearerToken = "(秘密)"

def get_twittertrend(location_id: int):
    url = f'https://api.twitter.com/1.1/trends/place.json'
    headers = {'Authorization' : f'Bearer {bearerToken}'}
    params = {'id': location_id}
    response = requests.get(url, params=params, headers=headers)
    if response.ok:
        return response.json()
    else:
        errors = response.json()['errors']
        for e in errors:
            print(f'{e["code"]} : {e["message"]}')
        return None

# 日本のWOEID一覧
# https://qiita.com/hogeta_/items/8e3224c4960e19b7a33a
def main():
    woeid = 1117881 # 新潟
    res = get_twittertrend(woeid)
    if res is None:
        exit()
    print('========取得データ========')
    print(json.dumps(res, indent=2, ensure_ascii=False))
    print('========データを取得========')
    for r in res:
        for i, trend in enumerate(r['trends']):
            print(f'{i} : {trend["name"]}')

if __name__ == '__main__':
    main()
APIを作ってみる
Google App Scriptを使えばかんたんにWeb APIを作ることができる。 https://script.google.com/home
Google翻訳する
Web API提供側(Typescript)
function doGet(e: { parameter: any } | undefined) {
  const p = e.parameter
  const translatedText = LanguageApp.translate(p.text, p.source, p.target)
  return ContentService.createTextOutput(translatedText)
}
import requests

id = '(秘密)'
dep_id = '(アプリのID)'
source = 'en'
target = 'ja'
text = 'hello'
params = {
    'target': target,
    'text': text,
    'source':source,
}
url = f'https://script.google.com/macros/s/{dep_id}/exec'
print(url)


response = requests.get(url, params = params)
print(response.ok)
print(response.text)
終わりに
勉強会で一部のWebAPIを取り上げて、WebAPIでどんなことができるかを説明しました。 プログラムを作ることまではしませんでしたが、勉強のきっかけにはなったかなと思います。
プログラム内ではHTTPリクエストやJSONの作成・解析を行っていますが、これらはOpenBDやTwitter以外の多くのサービスで使われています。 一つ勉強しておくと様々な応用ができそうです。
ところで
最近この本買いました。これから読んでみます。

スキャンしたPDFの処理を考える その4 まとめとおまけ(画像圧縮・zipでまとめる)
https://s-densan.hatenablog.com/entry/2021/02/11/ocr3の続きです。
処理のステップ
以下のステップをつなげて、1つのツールとして完成させます。
- PDFを画像に変換する
→popplerに含まれるpdfimagesを使いました。 - 画像にOCR処理をかける
→OCRを行うGoogleのツールtesseractを使いました。 - 検索の仕組みを考える
→画像にExifを情報を埋め込むツールexiftoolを使いました。
プログラム
今までのプログラムを含めて、つながるようにちょいちょいと改修して以下のようにしました。
# ocr4.py
import json
import tempfile
import os
from typing import List, Dict
import glob
import subprocess

def main():
    # 入力フォルダ
    src_dir = r'C:\ocr_src'
    # src_dir = r'C:\Users\Shimpei Ueno\Documents\ScanSnap'
    dst_dir = r'C:\ocr_dst'

    # 入力フォルダ内のファイル一覧を取得
    pdf_path_list = glob.glob(os.path.join(src_dir, '*.pdf'))

    text_path_list = []
    for pdf_path in pdf_path_list:
        pdf_name = os.path.splitext(os.path.basename(pdf_path))[0]
        dst_dir_onefile = os.path.join(dst_dir, pdf_name)
        if os.path.exists(dst_dir_onefile):
            continue
        image_path_list = pdf2image(pdf_path, dst_dir_onefile)
        for image_path in image_path_list:
            text = ocr_text(image_path)
            text_path = os.path.splitext(image_path)[0] + '.txt'
            with open(text_path, 'w') as fp:
                fp.write(text)
            set_exif(image_path, text)
    print('完了')
    print('\n'.join(text_path_list))

def pdf2image(src_pdf_path: str, dst_path: str) -> List[str]:
    """
    PDFファイルを複数の画像にして保存する

    Parameters
    ----------
    src_pdf_path : str
        入力PDFファイルパス
    dst_path : str
        出力先フォルダパス

    Returns
    -------
    List[str]
        作成した画像のファイルパス
    """
    # プログラム名(必要ならばフルパスで指定)
    program = 'pdfimages'
    # 実行するコマンド
    command = f'{program} -j "{src_pdf_path}" out'
    # command = f'{program} -j "{src_pdf_path}" out'

    # 入力PDFファイルが存在しない場合は終了
    if not os.path.isfile(src_pdf_path):
        return []

    # 出力先フォルダが存在しない場合は作成
    if not os.path.isdir(dst_path):
        if os.path.isfile(dst_path):
            return
        else:
            os.makedirs(dst_path)
    # 移行前のカレントディレクトリを変数に保持
    curdir_tmp = os.getcwd()
    # カレントディレクトリを変更
    os.chdir(dst_path)
    # コマンド実行
    os.system(command)
    # カレントディレクトリをもとに戻す
    os.chdir(curdir_tmp)

    file_list = glob.glob(os.path.join(dst_path, 'out-*.png'))
    # file_list = glob.glob(os.path.join(dst_path, 'out-*.jpg'))
    return file_list


def set_exif(image_path: str, comment: str) -> bool:
    """
    一つの画像ファイルに対し、exifコメント(XP Comment)を設定する。

    Parameters
    ----------
    image_path : str
        設定対象の画像ファイルパス
    comment : str
        XP Commentに設定する文字列

    Returns
    -------
    bool
        成否(true:成功, false:失敗)
    """
    # プログラム名(必要ならばフルパスで指定)
    program = 'exiftool'

    json_data = [ {'XPComment': comment} ]

    # 入力画像ファイルが存在しない場合は終了
    if not os.path.isfile(image_path):
        return False

    with tempfile.TemporaryDirectory() as dname:
        json_path = os.path.join(dname, 'tmp.json')
        with open(json_path, 'w') as fp:

            fp.write(json.dumps(json_data))
            fp.close()

            # 実行するコマンド
            command = f'{program} -overwrite_original -json="{fp.name}" "{image_path}"'

            # コマンド実行
            try:
                print(command)
                res = subprocess.check_output(command)
            except Exception as ex:
                print(f'コマンド実行中にエラーが発生しました。command = {command}, Exception = {ex}')
                return False
            return True

def ocr_text(src_image_path: str) -> str:
    """
    一つの画像ファイルに対し、日本語のOCR処理を行い、そのテキストを返却する。

    Parameters
    ----------
    src_image_path : str
        入力画像ファイルパス

    Returns
    -------
    str
        OCR結果のテキスト
    """
    # プログラム名(必要ならばフルパスで指定)
    program = 'tesseract'
    # 実行するコマンド
    command = f'{program} -l jpn "{src_image_path}" stdout'

    # 入力画像ファイルが存在しない場合は終了
    if not os.path.isfile(src_image_path):
        return False

    # 出力先フォルダが存在しない場合は作成
    # コマンド実行
    try:
        res = subprocess.check_output(command)
    except Exception as ex:
        print(f'コマンド実行中にエラーが発生しました。command = {command}, Exception = {ex}')
        return False
    res_text = res.decode('utf-8').replace(' ', '').replace('\r\n', '\n')
    return res_text

if __name__ == "__main__":
    main()
以上でツールの完成です。
おまけ
ページ毎に画像バラバラでは扱いづらいので以下も実施しました。
- 画像を縮小、かつ形式をwebp(サイズと画質のバランスが良いとのこと)にしてサイズ節約。
- zipでアーカイブして1ファイルにまとめる。拡張子は漫画本アプリなどで使われるcbzとする。
なお、これをすると検索はできなくなります(本末転倒では。。。) 個人で使う場合はEvernoteとかで管理するので、本文にOCRしたテキストを貼っておけば検索できますので、それより扱いやすさを重視しました。
画像の変換にはImageMagickのコマンドmagick、zip圧縮は7-Zipについてくるコマンド7zを使いました。
import json
import tempfile
import os
from typing import List, Dict
import glob
import subprocess
import shutil

def main():
    # 入力フォルダ
    src_dir = r'C:\ocr_src'
    # src_dir = r'C:\Users\Shimpei Ueno\Documents\ScanSnap'
    dst_dir = r'C:\ocr_dst'

    # 入力フォルダ内のファイル一覧を取得
    pdf_path_list = glob.glob(os.path.join(src_dir, '*.pdf'))

    text_path_list = []
    for pdf_path in pdf_path_list:
        pdf_name = os.path.splitext(os.path.basename(pdf_path))[0]
        dst_dir_onefile = os.path.join(dst_dir, pdf_name)
        if os.path.exists(dst_dir_onefile):
            continue
        image_path_list = pdf2image(pdf_path, dst_dir_onefile)
        for image_path in image_path_list:
            text = ocr_text(image_path)
            text_path = os.path.splitext(image_path)[0] + '.txt'
            with open(text_path, 'w') as fp:
                fp.write(text)
            set_exif_res = set_exif(image_path, text)
            if set_exif_res:
                # 画像変換
                conv_path = os.path.splitext(image_path)[0] + '.webp'
                conv_image(image_path, conv_path, quality=60, long_side = 1920)
                # conv_path = os.path.splitext(image_path)[0] + '.jpg'
                # conv_image(image_path, conv_path, quality=60, long_side = 1920)
                os.remove(image_path)
                text_path_list.append(conv_path)
        # zip圧縮
        zip_file_path = dst_dir_onefile + '.cbz'
        archive_zip(dst_dir_onefile, zip_file_path)
        # zip圧縮前フォルダ削除
        shutil.rmtree(dst_dir_onefile)

    print('完了')
    print('\n'.join(text_path_list))

def pdf2image(src_pdf_path: str, dst_path: str) -> List[str]:
    """
    PDFファイルを複数の画像にして保存する

    Parameters
    ----------
    src_pdf_path : str
        入力PDFファイルパス
    dst_path : str
        出力先フォルダパス

    Returns
    -------
    List[str]
        作成した画像のファイルパス
    """
    # プログラム名(必要ならばフルパスで指定)
    program = 'pdfimages'
    # 実行するコマンド
    command = f'{program} -png "{src_pdf_path}" out'
    # command = f'{program} -j "{src_pdf_path}" out'

    # 入力PDFファイルが存在しない場合は終了
    if not os.path.isfile(src_pdf_path):
        return []

    # 出力先フォルダが存在しない場合は作成
    if not os.path.isdir(dst_path):
        if os.path.isfile(dst_path):
            return
        else:
            os.makedirs(dst_path)
    # 移行前のカレントディレクトリを変数に保持
    curdir_tmp = os.getcwd()
    # カレントディレクトリを変更
    os.chdir(dst_path)
    # コマンド実行
    os.system(command)
    # カレントディレクトリをもとに戻す
    os.chdir(curdir_tmp)

    file_list = glob.glob(os.path.join(dst_path, 'out-*.png'))
    # file_list = glob.glob(os.path.join(dst_path, 'out-*.jpg'))
    return file_list


def set_exif(image_path: str, comment: str) -> bool:
    """
    一つの画像ファイルに対し、exifコメント(XP Comment)を設定する。

    Parameters
    ----------
    image_path : str
        設定対象の画像ファイルパス
    comment : str
        XP Commentに設定する文字列

    Returns
    -------
    bool
        成否(true:成功, false:失敗)
    """
    # プログラム名(必要ならばフルパスで指定)
    program = 'exiftool'

    json_data = [ {'XPComment': comment} ]

    # 入力画像ファイルが存在しない場合は終了
    if not os.path.isfile(image_path):
        return False

    with tempfile.TemporaryDirectory() as dname:
        json_path = os.path.join(dname, 'tmp.json')
        with open(json_path, 'w') as fp:

            fp.write(json.dumps(json_data))
            fp.close()

            # 実行するコマンド
            command = f'{program} -overwrite_original -json="{fp.name}" "{image_path}"'

            # コマンド実行
            try:
                print(command)
                res = subprocess.check_output(command)
            except Exception as ex:
                print(f'コマンド実行中にエラーが発生しました。command = {command}, Exception = {ex}')
                return False
            return True

def ocr_text(src_image_path: str) -> str:
    """
    一つの画像ファイルに対し、日本語のOCR処理を行い、そのテキストを返却する。

    Parameters
    ----------
    src_image_path : str
        入力画像ファイルパス

    Returns
    -------
    str
        OCR結果のテキスト
    """
    # プログラム名(必要ならばフルパスで指定)
    program = 'tesseract'
    # 実行するコマンド
    command = f'{program} -l jpn "{src_image_path}" stdout'

    # 入力画像ファイルが存在しない場合は終了
    if not os.path.isfile(src_image_path):
        return False

    # 出力先フォルダが存在しない場合は作成
    # コマンド実行
    try:
        res = subprocess.check_output(command)
    except Exception as ex:
        print(f'コマンド実行中にエラーが発生しました。command = {command}, Exception = {ex}')
        return False
    res_text = res.decode('utf-8').replace(' ', '').replace('\r\n', '\n')
    return res_text


def conv_image(src_image_path: str, dst_image_path: str, quality: int = None, long_side: int = None):
    """
    画像ファイルをmagickで別形式に変換する。

    Parameters
    ----------
    src_image_path : str
        入力画像ファイルパス
    dst_image_path : str
        出力画像ファイルパス
    quality : int
        画質(0~100)

    """
    # プログラム名(必要ならばフルパスで指定)
    program = 'magick'

    # 入力画像ファイルが存在しない場合は終了
    if not os.path.isfile(src_image_path):
        return False


    # 実行するコマンド
    if quality is not None:
        quality_option = f'-quality {quality}'
    else:
        quality_option = ''

    if long_side is not None:
        resize_option = f'-resize "{long_side}x{long_side}>"'
    else:
        resize_option = ''

    command = f'{program} {quality_option} "{src_image_path}" {resize_option} "{dst_image_path}"'


    # コマンド実行
    try:
        print(command)
        res = subprocess.check_output(command)
    except Exception as ex:
        print(f'コマンド実行中にエラーが発生しました。command = {command}, Exception = {ex}')
        return False
    return True


def archive_zip(src_dir_path: str, dst_zip_path: str):
    """
    zip形式でフォルダをアーカイブする(無圧縮)

    Parameters
    ----------
    src_dir_path : str
        入力フォルダパス
    dst_zip_path : str
        出力zipファイルパス
    """
    # プログラム名(必要ならばフルパスで指定)
    program = '7z'

    # 入力画像ファイルが存在しない場合は終了
    if not os.path.isdir(src_dir_path):
        return False

    # 実行するコマンド

    command = f'{program} a -tzip -mx=0 "{dst_zip_path}" "{src_dir_path}"'

    # コマンド実行
    try:
        print(command)
        res = subprocess.check_output(command)
    except Exception as ex:
        print(f'コマンド実行中にエラーが発生しました。command = {command}, Exception = {ex}')
        return False
    return True

if __name__ == "__main__":
    main()
スキャンしたPDFの処理を考える その3 検索の仕組みを考える
https://s-densan.hatenablog.com/entry/2021/02/11/ocr2の続きです。
処理のステップ
- PDFを画像に変換する
- 画像にOCR処理をかける
- 検索の仕組みを考える ←今回はここ
ファイル検索について
Windowsのファイル検索では一部のファイルは内部のデータまで検索してくれます。 テキストファイルはわかりやすいですが、ExcelなどのオフィスファイルやJPG画像のメタ情報(タイトルやタグなど)も対象です。画像はなぜかJPGだけのようです。
まずは手動で検索できるか確認してみます。
JPG画像を右クリックし、「詳細」タブの「コメント」に、OCRされた文章を貼り付けます。
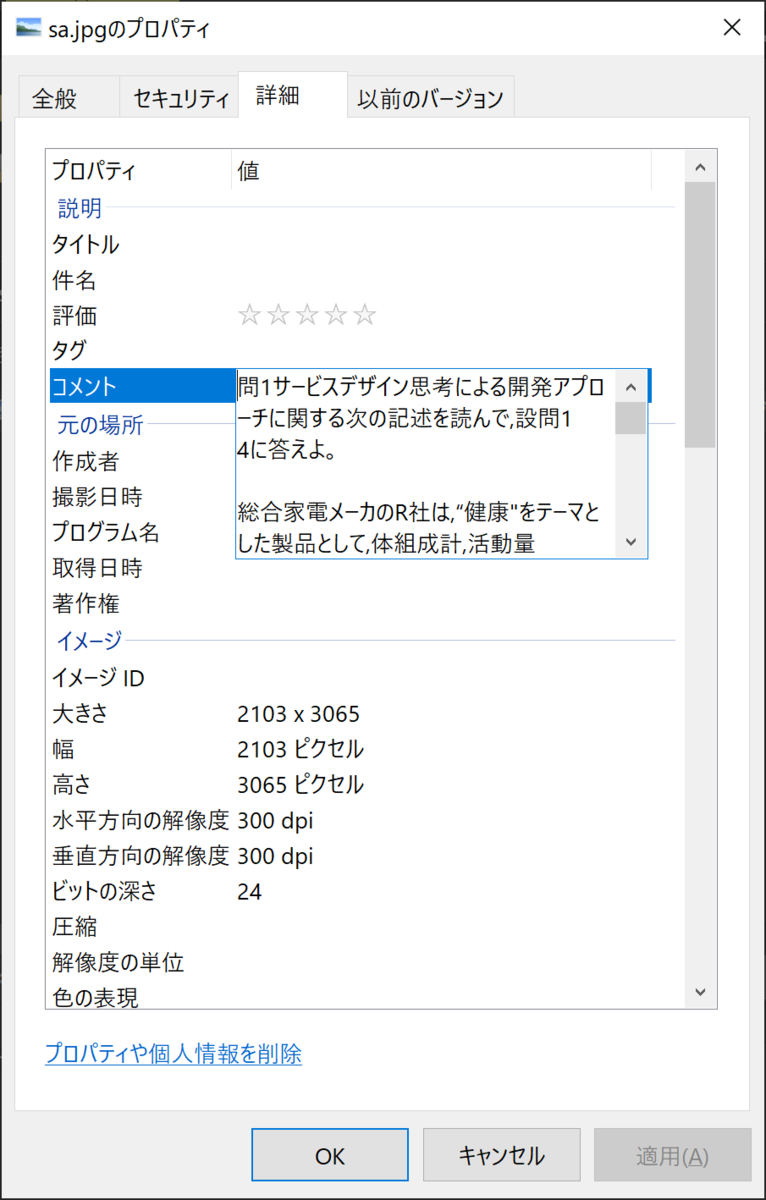
その後、エクスプローラーで検索します、が初期状態では多分見つかりません。 下図のように「詳細オプション」から「ファイル コンテンツ」にチェックを入れると見つかります。

大丈夫そうですね。
ところで今設定した「コメント」というのは、Exif情報のようです。 Exif情報は写真を撮った場合に画像に付与される情報で、例えばカメラの機種や焦点距離などの撮影時の情報などが含まれます。
必要コマンドのダウンロード
Exifを操作するツールであるexiftoolを使います。
exiftoolをインストールし、以下のコマンドを実行します。
exiftool (画像ファイル名)
以下のように画像情報が出力されれば成功です。 このファイルはコメントに日本語を設定してありました。
ExifTool Version Number : 12.18 File Name : sa.jpg Directory : . File Size : 513 KiB File Modification Date/Time : 2021:02:15 19:51:04+09:00 File Access Date/Time : 2021:02:15 19:51:04+09:00 File Creation Date/Time : 2021:02:10 13:56:02+09:00 File Permissions : rw-rw-rw- File Type : JPEG File Type Extension : jpg MIME Type : image/jpeg JFIF Version : 1.00 Resolution Unit : inches X Resolution : 300 Y Resolution : 300 Exif Byte Order : Big-endian (Motorola, MM) XP Comment : 蝠・繧オ繝シ繝薙せ繝・じ繧、繝ウ諤晁・↓繧医k髢狗匱繧「繝励Ο繝シ繝√↓髢「縺吶k谺。縺ョ險倩ソー繧定ェュ繧薙〒,險ュ蝠・..4縺ォ遲斐∴繧医・...邱丞粋螳カ髮サ繝。繝シ繧ォ縺ョR遉セ縺ッ,窶懷▼蠎キ"繧偵ユ繝シ繝槭→縺励◆陬ス蜩√→縺励※,菴鍋オ・・險・豢サ蜍暮㍼..險・繝ゥ繝ウ繝九Φ繧ー繧ヲ繧ゥ繝・メ縺ェ縺ゥ縺ョ蛛・蠎キ讖溷勣繧定」ス騾,雋ゥ螢イ縺励※縺・k縲・...[譁ー 陬ス蜩√↓菫ゅk蜿也オ・...R遉セ縺ッ,莠コ縲・′驥崎ヲ悶☆繧倶セ。蛟、縺娯懊Δ繝寂昴°繧俄懊さ繝・縺ク縺ィ繧キ繝輔ヨ縺励※縺・k霑大ケエ縺ョ迥カ..豕√r雕上∪縺医※,閾ェ遉セ縺ョ陬ス蜩√r騾壹§縺滉ココ縲・・逕滓エサ縺ョ繝・ぅ繧ク繧ソ繝ォ蛹悶・蜿也オ・r謗ィ騾イ縺励※縺翫j,..繧ケ繝槭・繝医ヵ繧ゥ繝ウ逕ィ縺ョ繧「繝悶Μ繧ア繝シ繧キ繝ァ繝ウ繧ス繝輔ヨ繝峨ヨ繧ヲ繧ァ繧「(莉・荳九Μ繧コ繧ケ繝槭・繧「繝励Μ縺ィ縺・≧)繧・.髢狗匱縺励※縺・k縲ゅせ繝槭・繧「繝励Μ縺ョ蛻ゥ逕ィ閠・・,菴鍋オ・・險医〒貂ャ螳壹@縺滉ス馴㍾,菴楢р閧ェ邇・遲玖i..驥上↑縺ゥ縺ョ繝・・繧ソ繧偵せ繝槭・繝医ヵ繧ゥ繝ウ縺ォ霆「騾√@縺ヲ,貂ャ螳夂オ先棡縺ョ螻・豁エ繧帝夢隕ァ縺吶k縺薙→縺後〒縺・.繧九ゅ せ繝槭・繧「繝励Μ縺ッ,菴鍋オ・・險医・雉シ蜈・閠・・縺・■,蛟倶ココ諠・ア,雜」蜻ウ繝サ蝸懷・ス,蛛・蠎キ縺ォ髢「縺・.繧九い繝ウ繧ア繝シ繝 医↓蝗樒ュ斐@縺溯・↓蟇セ縺励※,辟。譁吶〒謠蝉セ帙@縺ヲ縺・k縲・...R遉セ縺ッ,菴鍋オ・・險医・譁ー陬ス蜩√r蜊雁ケエ蠕後↓逋コ螢イ 縺吶k縺薙→繧呈アコ螳壹@縺溘ゆスオ縺帙※,迴セ蝨ィ謠蝉セ・.縺励※縺・k繧ケ繝槭・繧「繝励Μ繧貞姐譁ー縺励※,譌・縲・・蛛・蠎キ縺ォ髢「繧上k豢サ蜍輔ョ繝シ繧ソ(莉・荳・蛛・蠎キ豢サ蜍・.繝ュ繧ー縺ィ縺・≧繧翫上r逋サ骭イ縺ァ縺阪k譁ー縺溘↑繧ケ繝槭・繧「繝悶Μ繝シ(莉・荳 ・蛛・蠎キ邂。逅・い繝励ヶ繝ェ縺ィ縺・≧)縺ォ縺・.繧九%縺ィ縺ォ縺励◆縲ょ▼蠎キ豢サ蜍輔Ο繧ー縺ォ縺ッ,菴鍋オ・・險医°繧牙叙蠕励☆繧 九ョ繝シ繧ソ縺ォ蜉縺医※,豢サ蜍暮㍼險・.縺ァ險域クャ縺吶k豁ゥ謨ー,閼域牛,逹。逵譎る俣縺ェ縺ゥ縺ョ豢サ蜍暮㍼,鬟滉コ句・螳ケ,驕句虚險倬鹸縺ェ縺ゥ縺悟性縺セ繧後k縲・.縺セ縺・蛛・蠎キ邂。逅・い繝励Μ縺ッ,縺薙l縺セ縺ァ縺ョ蛟倶ココ縺ォ髯仙ョ壹@縺溷茜逕ィ縺ォ蜉縺医※,蛻ゥ逕ィ閠・酔螢ォ縺ョ繧ウ..繝溘Η繝九ユ繧」豢サ蜍輔↓繧ょ茜逕ィ縺ァ縺阪k譁ケ驥昴↓縺励◆縲ょ・菴鍋噪縺ォ縺ッ,蛛・蠎キ邂。逅・い繝励Μ縺ョ蛻ゥ逕ィ閠・′..險倬鹸縺励◆蛛・蠎キ豢サ蜍募ヲゅげ繧偵う繝ウ繧ソ繝シ繝阪ャ繝井ク翫・繧ウ繝ュ繝溘Η繝九ユ繧」(莉・荳九が繝ウ繝ゥ繧、繝ウ繧ウ繝溘Η..繝九ユ繧」縺ィ縺・≧)縺ァC蜈ア譛峨§,縺贋コ偵>縺ョ險倬鹸縺ォ繧ウ繝。繝ウ繝医r莉倥¢縺溘r縺溘j繝ェ繧ェ繝ウ繝ゥ繧、繝ウ繧ウ繝 溘Η繝・.繝・ぅ蜀・〒鬆・ス阪r遶カ縺・粋縺」縺溘j,蟆る摩螳カ縺梧怏譁吶〒謖・ー弱@縺溘j縺ィ縺・▲縺・螟壽ァ倥↑譁ケ豕輔〒繧ウ..繝溘Η繝九ユ繧」豢サ蜍輔′縺ァ縺阪k縺斐%縺ィ繧堤岼謖・☆縺薙#縺薙→縺ォ縺倥◆縲・...R遉セ縺ッ,蛛・蠎キ邂。逅・・繝悶Μ縺ィ繧ェ繝ウ繝ゥ繧、繝ウ繧ウ繝溘Η繝九ユ繧」繧定檮蜷医§縺溘し繝シ繝薙せ(莉・荳・譁ー..繧オ繝シ繝薙せ縺ィ縺・≧縺・j繧呈エサ逕ィ縺倥〒繝薙ず繝阪せ繧呈僑螟ァ莠・k縺溘a縺ォ閾ェ遉セ縺ァ繧ェ繝ウ繝ゥ繧、繝ウ繧ウ繝溘Η繝・.繝・ぅ繧帝°蝟カ縺・谺。縺ォ遉コ縺咎未騾」驛ィ鄂イ縺ァ譁ー繧オ繝シ 繝薙せ縺ョ髢狗匱,驕句霧繧定。後≧縺薙→縺ォ縺励◆縲・...(1)蛛・蠎キ蠅鈴イ莠区・ュ驛ィ..蠕捺擂縺九i陦後▲縺ヲ縺・◆菴鍋オ・・險・ 豢サ蜍暮㍼險医r蜷ォ繧蛛・蠎キ讖溷勣縺ョ蝠・刀莨∫判,髢狗匱縺ォ蜉縺・...|繧ッ| Padding : (Binary data 2096 bytes, use -b option to extract) Comment : PFU ScanSnap Manager #S1500 About : uuid:faf5bdd5-ba3d-11da-ad31-d33d75182f1b Warning : [minor] Fixed incorrect URI for xmlns:MicrosoftPhoto Image Width : 2103 Image Height : 3065 Encoding Process : Baseline DCT, Huffman coding Bits Per Sample : 8 Color Components : 3 Y Cb Cr Sub Sampling : YCbCr4:2:0 (2 2) Image Size : 2103x3065 Megapixels : 6.4
日本語の部分は化けてしまいます。
また、以下のコマンドでコメントの設定ができます。
exiftool -XPComment='(設定する文字列)' (画像ファイル名)
ただし、日本語だとうまく設定できません。 そこでjsonファイルを作って、それを入力させます。
exifinfo.jsonという名前で以下のデータを含むテキストファイルを作成します。文字コードはUTF-8としてください。
[{
  "XPComment": "日本語のテストです"
}]
画像ファイルと同じフォルダにexifinfo.jsonを保存し、以下のコマンドを実行します。
exiftool -g -json='exifinfo.json' (画像ファイル名)
1 image files updatedと表示されればOKです。
ファイルのプロパティを見ると反映されています。

プログラムを作る
指定したフォルダの中のすべての画像に対してコメントを設定するプログラムです。
# ocr_card.py
import json
import tempfile
import os
from typing import List, Dict
import glob
import subprocess

def main():
    # 入力フォルダ
    image_dir = r'C:\ocr_src'

    # 入力フォルダ内のファイル一覧を取得
    image_file_list = glob.glob(os.path.join(image_dir, '*'))

    text_path_list = []
    for image_path in image_file_list:
        # 対象とする拡張子
        allow_exts = ['.jpg', '.jpeg', '.png', '.bmp', '.webp']
        if os.path.splitext(image_path)[1].lower() not in allow_exts:
            # 対象外のファイルの場合は次のファイルへ
            continue
        # 出力テキストファイルパス
        text_path = os.path.splitext(image_path)[0] + '.txt'
        # OCR実行
        ocr_result = set_exif(image_path, "ここにOCRした\n文字を設定します。")
        if ocr_result:
            text_path_list.append(text_path)
    print('完了')
    print('\n'.join(text_path_list))

def set_exif(image_path: str, comment: str) -> bool:
    """
    一つの画像ファイルに対し、exifコメント(XP Comment)を設定する。

    Parameters
    ----------
    image_path : str
        設定対象の画像ファイルパス
    comment : str
        XP Commentに設定する文字列

    Returns
    -------
    bool
        成否(true:成功, false:失敗)
    """
    # プログラム名(必要ならばフルパスで指定)
    program = 'exiftool'

    json_data = [ {'XPComment': comment} ]

    # 入力画像ファイルが存在しない場合は終了
    if not os.path.isfile(image_path):
        return False

    with tempfile.TemporaryDirectory() as dname:
        json_path = os.path.join(dname, 'tmp.json')
        with open(json_path, 'w') as fp:

            fp.write(json.dumps(json_data))

            # 実行するコマンド
            command = f'{program} -json="{fp.name}" "{image_path}"'

            # コマンド実行
            try:
                print(command)
                res = subprocess.check_output(command)
            except Exception as ex:
                print(f'コマンド実行中にエラーが発生しました。command = {command}, Exception = {ex}')
                return False
            return True
終わりに
画像にコメントを設定することができました。 応用すればコメントではなくタグやタイトルなど他の項目も設定できるかと思います。 ドキュメントの整理だけでなく写真の整理でも役立ちそうです。
スキャンしたPDFの処理を考える その2 画像にOCR処理をかける
https://s-densan.hatenablog.com/entry/2021/02/04/pdf1 の続きです。
処理のステップ
- PDFを画像に変換する
- 画像にOCR処理をかける ←今回はここ
- 検索の仕組みを考える
必要コマンドのダウンロード
tesseractと日本語の学習データをインストールします。 tesseractはGoogle製のOCRソフトです。 この話はWindowsを前提としているのでバイナリを探しましょう。 ドイツのマンハイム大学図書館が公開しているようです。
32ビット版と64ビット版がありますが、特に理由なければ64ビット版で良いと思います。
インストールが終わったらtesseractコマンドが使えるようになります。
tessaract --version
以下のように表示されればOKです。
tesseract v5.0.0-alpha.20201127
 leptonica-1.78.0
  libgif 5.1.4 : libjpeg 8d (libjpeg-turbo 1.5.3) : libpng 1.6.34 : libtiff 4.0.9 : zlib 1.2.11 : libwebp 0.6.1 : libopenjp2 2.3.0
 Found AVX2
 Found AVX
 Found FMA
 Found SSE
 Found libarchive 3.3.2 zlib/1.2.11 liblzma/5.2.3 bz2lib/1.0.6 liblz4/1.7.5
 Found libcurl/7.59.0 OpenSSL/1.0.2o (WinSSL) zlib/1.2.11 WinIDN libssh2/1.7.0 nghttp2/1.31.0
次に日本語をいい感じに認識させるために学習済みデータをインストールします。
Traineddata Files for Version 4.00 + | tessdoc
公式サイトからgithubにジャンプします。 tessdata_fast、tessdata_best、tessdataの3種類がありますが、 今回は精度を重視してtessdata_bestを選びました。
jpn.traineddataとjpn_vert.traineddataをダウンロードして、tesseractインストールフォルダの下のtessdata内に格納します。
お試し
コマンドプロンプトを開き、以下のコマンドを実行します。
tesseract -l jpn (画像ファイル名) stdout
少し間をおいて、画面に文字が出力されれば成功です。 なお、不自然に文字の間にスペースが挟まれるようです。
私は下図を読み込ませてみました。 某試験の一部分です。
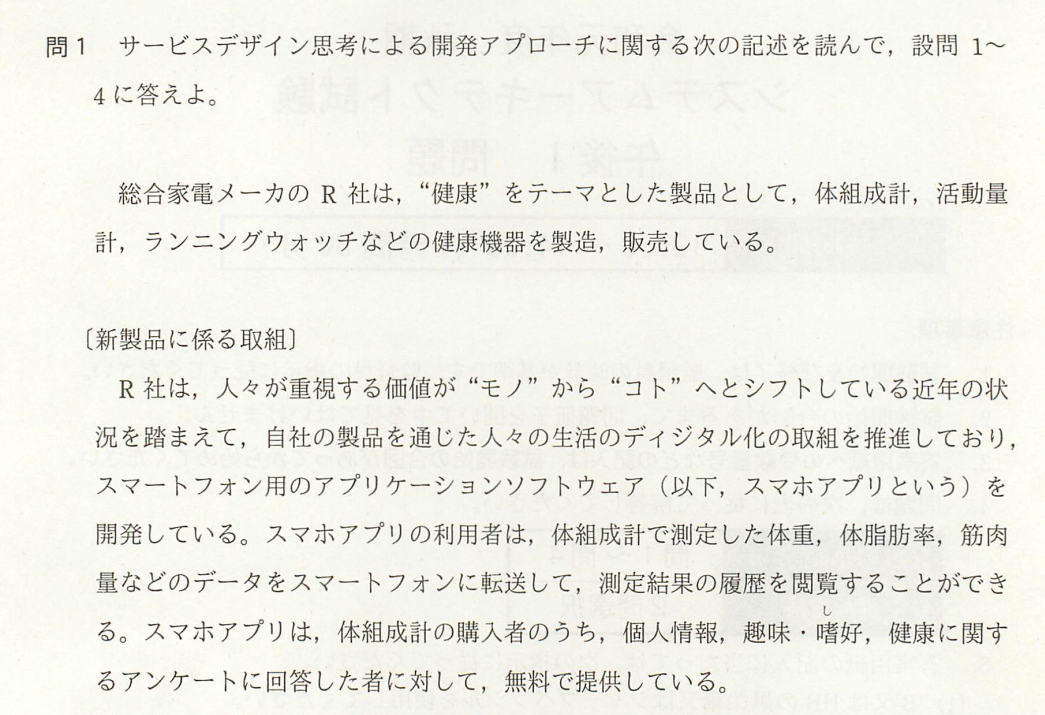
問 1 サー ビス デザ イン 思考 に よる 開発 アプ ロー チ に 関す る 次 の 記述 を 読ん で , 設問 1
4 に 答え よ 。

総合 家電 メー カ の R 社 は , “健康 "を テー マ と し た 製品 と し て , 体 組成 計 , 活動 量
計 , ラン ニン グ ウ ォ ッ チ な どの 健康 機器 を 製造 , 販売 し て いる 。

[ 新 製品 に 係る 取組

R 社 は , 人 々 が 重視 する 価値 が “モノ” から “コト "へ と シフ ト し て いる 近年 の 状
況 を 踏ま えて , 自社 の 製品 を 通じ た 人 々 の 生活 の ディ ジタル 化 の 取組 を 推進 し て お り ,
スマ ー ト フォ ン 用 の アブ リケーション ソフ トド トウェア (以下 リズ スマ ホ ア プ リ と いう ) を
開発 し て いる 。 ス マ ホ ア プリ の 利用 者 は , 体 組成 計 で 測定 し た 体重 , 体 脂肪 率 , 筋肉
量 な どの デー タ を スマ ー ト フォ ン に 転送 し て , 測定 結果 の 履歴 を 閲覧 する こと が で き
る 。 ス マ ホ ア プリ は , 体 組成 計 の 購入 者 の うち , 個人 情報 , 趣味 ・ 嗜好 , 健康 に 関す
る アン ケー ト に 回 答 し た 者 に 対し て , 無料 で 提供 し て いる 。
なお、最後のstdoutの部分には出力先ファイルを指定するのですが、stdoutは特殊で出力先を標準出力にするとのことです。
プログラムを作る
指定したフォルダの中のすべての画像に対して、OCR処理を施し、それぞれ(元のファイル名).txt ファイルに保存します。
import os
from typing import List, Dict
import glob
import subprocess

def main():
    # 入力フォルダ
    image_dir = r'C:\ocr_src'

    # 入力フォルダ内のファイル一覧を取得
    image_file_list = glob.glob(os.path.join(image_dir, '*'))

    text_path_list = []
    for image_path in image_file_list:
        # 対象とする拡張子
        allow_exts = ['.jpg', '.jpeg', '.png', '.bmp', '.webp']
        if os.path.splitext(image_path)[1].lower() not in allow_exts:
            # 対象外のファイルの場合は次のファイルへ
            continue
        # 出力テキストファイルパス
        text_path = os.path.splitext(image_path)[0] + '.txt'
        # OCR実行
        ocr_result = ocr_text(image_path, text_path)
        if ocr_result:
            text_path_list.append(text_path)
    print('完了')
    print('\n'.join(text_path_list))


def ocr_text(src_image_path: str, dst_text_path: str) -> bool:
    """
    一つの画像ファイルに対し、日本語のOCR処理を行い、dst_pathにその内容を保存する。

    Parameters
    ----------
    src_image_path : str
        入力画像ファイルパス
    dst_text_path : str
        出力テキストファイル名

    Returns
    -------
    bool
        成否(true:成功, false:失敗)
    """
    # プログラム名(必要ならばフルパスで指定)
    program = 'tesseract'
    # 実行するコマンド
    command = f'{program} -l jpn "{src_image_path}" stdout'

    # 入力画像ファイルが存在しない場合は終了
    if not os.path.isfile(src_image_path):
        return False

    # 出力先フォルダが存在しない場合は作成
    dst_dir = os.path.dirname(dst_text_path)
    if not os.path.isdir(dst_dir):
        if os.path.isfile(dst_dir):
            return False
        else:
            os.makedirs(dst_dir)
    # コマンド実行
    try:
        res = subprocess.check_output(command)
    except Exception as ex:
        print(f'コマンド実行中にエラーが発生しまshた。command = {command}, Exception = {ex}')
        return False
    res_text = res.decode('utf-8').replace(' ', '').replace('\r\n', '\n')

    # OCR情報をファイルに書き込み
    with open(dst_text_path, 'w') as fp:
        fp.write(res_text)

    return True
おわりに
画像からOCRでテキスト情報を取り出すことができました。 画像のままではコンピュータで処理しづらいですが、テキスト形式ならば 例えば検索・タグ付け・分類などできることが広がります。
スキャンしたPDFの処理を考える その1 PDFを画像に変換
はじめに
引っ越しの際に買ったScanSnap S1500でPDFを作成していますが、PDFって閲覧できるソフトも限られるし、編集もしづらく扱いづらいです。 スキャンの仕方にもよるのですが、サイズも結構大きくなります。
スキャンしたPDFについて、うまいこと管理したく、次のことにチャレンジしてみます。
また、言語はPythonで作るのですが、裏テーマでなるべくPython用のライブラリを使わず、Windowsで使えるコマンドを使って実現します。 Python独自の部分を変更すれば、バッチやExcelなどからも使えるということになります。
処理のステップ
- PDFを画像に変換する
- 画像にOCR処理をかける
- 検索の仕組みを考える
必要コマンドのダウンロード
popplerをインストールします。 popplerはpdfを変換したり作成したりといった様々な事ができるコマンドの詰め合わせです。
インストールが終わったら、pdfimagesというコマンドが使えるようになっているはずです。
プロンプトで以下のコマンドで使い方を確認します。
pdfimages -h
以下のように出力されれば成功です。
pdfimages version 0.89.0
Copyright 2005-2020 The Poppler Developers - http://poppler.freedesktop.org
Copyright 1996-2011 Glyph & Cog, LLC
Usage: pdfimages [options] <PDF-file> <image-root>
  -f <int>       : first page to convert
  -l <int>       : last page to convert
  -png           : change the default output format to PNG
  -tiff          : change the default output format to TIFF
  -j             : write JPEG images as JPEG files
  -jp2           : write JPEG2000 images as JP2 files
  -jbig2         : write JBIG2 images as JBIG2 files
  -ccitt         : write CCITT images as CCITT files
  -all           : equivalent to -png -tiff -j -jp2 -jbig2 -ccitt
  -list          : print list of images instead of saving
  -upw <string>  : user password (for encrypted files)
  -p             : include page numbers in output file names
  -q             : don't print any messages or errors
  -v             : print copyright and version info
  -h             : print usage information
  -help          : print usage information
  --help         : print usage information
  -?             : print usage information
お試し
C:\ocr_srcフォルダに、PDFファイルscan.pdfが入っているとします。

c:\ocr_dstに移動し、コマンドラインで以下のように打ち込みます。
pdfimages -png "C:\ocr_src\scan.pdf" out
同じフォルダに以下のファイルができます。(8ページの場合)

プログラムを作る
import os
from typing import List, Dict
import glob


def main():
    # 入力ファイル
    src_pdf_path = r'C:\ocr_src\scan.pdf'
    # 出力ディレクトリ
    dst_dir = r'C:\ocr_dst'
    # 画像に変換してファイルリストを取得
    file_list = pdf2image(src_pdf_path, dst_dir)
    print(file_list)


def pdf2image(src_pdf_path: str, dst_path: str) -> List[str]:
    """
    PDFファイルを複数の画像にして保存する

    Parameters
    ----------
    src_pdf_path : str
        入力PDFファイルパス
    dst_path : str
        出力先フォルダパス

    Returns
    -------
    List[str]
        作成した画像のファイルパス
    """
    # プログラム名(必要ならばフルパスで指定)
    program = 'pdfimages'
    # 実行するコマンド
    command = f'{program} -png "{src_pdf_path}" out'

    # 入力PDFファイルが存在しない場合は終了
    if not os.path.isfile(src_pdf_path):
        return []

    # 出力先フォルダが存在しない場合は作成
    if not os.path.isdir(dst_path):
        if os.path.isfile(dst_path):
            return
        else:
            os.makedirs(dst_path)
    # 移行前のカレントディレクトリを変数に保持
    curdir_tmp = os.getcwd()
    # カレントディレクトリを変更
    os.chdir(dst_path)
    # コマンド実行
    os.system(command)
    # カレントディレクトリをもとに戻す
    os.chdir(curdir_tmp)

    file_list = glob.glob(os.path.join(dst_path, 'out-*.png'))
    return file_list


if __name__ == "__main__":
    main()
終わりに
今回はPDFをプログラムで画像ファイルに変換できるようにしました。 次は画像ファイルをOCR処理をかけ、文字情報を取り出します。
ノーコード開発を触ってみた 2
https://s-densan.hatenablog.com/entry/2021/01/13/nocode1 のつづきです。
アプリを作るのに実施したことを綴っていきます。
余談: Twitterアカウント作りました
Glideについて
前回記載したとおり、ツールはGlideというものを使いました。
Build an app from a spreadsheet in five minutes, for free • Glide
データを作る
Google Spreadsheetで元データ作成
もともとイベント情報や物品購入について管理していたテーブルがあったので、 それをGoolge Spreadsheetに貼り付けます。

簿記帳としては…イマイチなフォーマットですが、まあとりあえず今あるデータで作成します。
数式はGlideのDataメニューで作成
会計年度はGlideのDataメニューの数式で作ります。 Google Spreadsheetでも数式を使えますが、Glideアプリからデータを追加した際は新しい行に数式が設定されません(多分)。
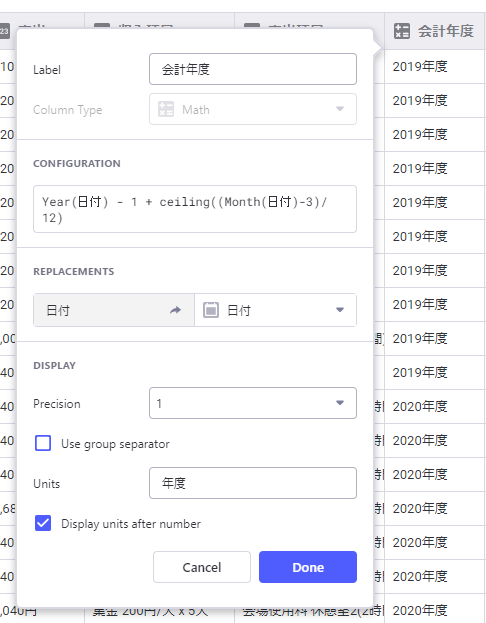
数式の種類はやや少ないかな。
集計ページを作る
Glideは集計することができない(ような気がする)ので、今回はGoogle Spreadsheetで集計ページを作成し、 Glideから参照させました。 集計はSUMIFとか使います。Excelできる人なら大丈夫かと。

収入の列のみを合計しています。
インターフェースを作る
レイアウトはテンプレートから選ぶだけ。
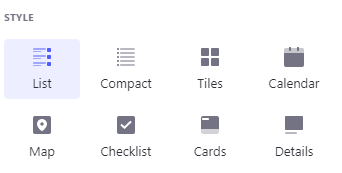
項目の表示や画面遷移も選択肢からクリックで選んでいきます。 データにURLの情報があるなら、リンクボタンが簡単に設定できます。

感想
インターフェースはデフォルトで格好いい
スマホアプリでよく見るデザインが揃っています。 最初に用意するテーブルに住所情報があれば、クリックひとつで地図アプリも作れます。 日付データが有ればカレンダーも作れます。
データさえあればサクッと作って素早く使える
アプリの動作は選ぶだけ。イメージを素早く実現できます。
やっぱりデータ整理術は必要
一方でデータが整理されていないと、画面作成に苦労しそうです。 1行で1データ、セルは結合しない、データの追加は下方向のみ、複数表があるならば連携できるIDを用意する、などなど。 データベースの知識があればなおよし。
まだまだいろいろなことができそう
文字クリックイベントを最後まで見ていくと…
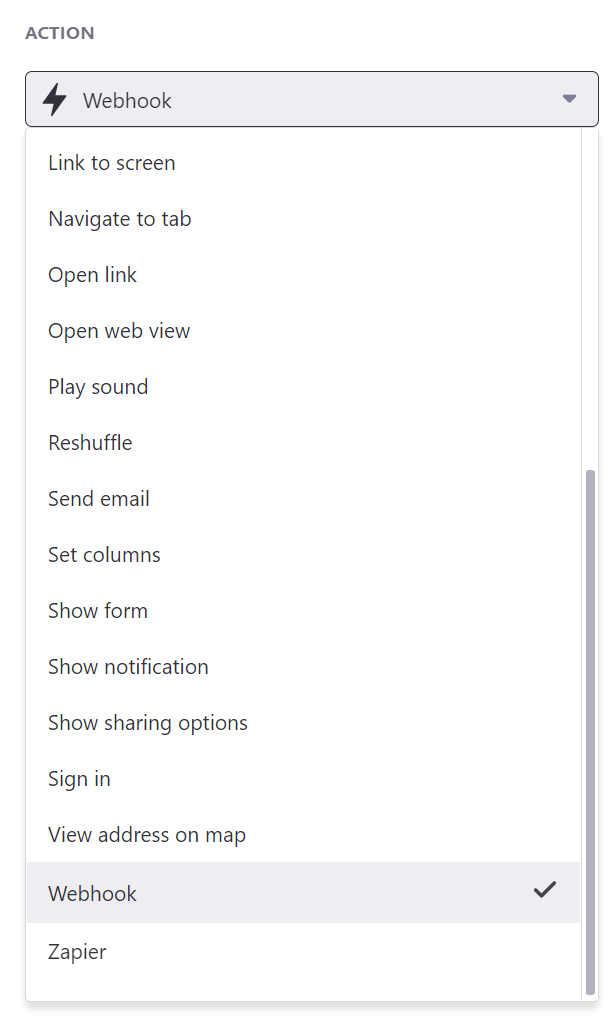
なんと、WebhookにZapier! どちらもIoT家電やマイコンと連携しやすい仕組みです。
終わりに
最初は「初心者でも簡単にアプリを作れる」という印象を持っていましたが、使ってみたところ 「ある程度(特にデータの)知識がある人が素早くアプリを作る」ためのツールのように思えます。
逆に考えると、データの整理術を身につけるためにノーコード開発をやってみる、というのも面白いかもしれません。